
For larger burn marks on starships that had recieved hits or the hull exploded), I thought I had read that you really don't use black, but more of a dark brown or grey?
What do you all use???
painting burn marks
Moderators: DasPhule, Moderators
-
Falcon5768
- Posts: 1042
- Joined: Tue Mar 02, 2004 7:49 pm
-
Jagdson

- Posts: 8738
- Joined: Mon Jul 15, 2002 8:27 pm
- Location: Hunched over my keyboard like a *pothoc* vulture, cursing my inability to properly budget my time.
Make your own determination by modeling actual blast marks on a scrap model or sheet plastic. Hold one of those capgun 6 or 8 shot rings next to the surface and apply heat. It's fairly safe and quite realistic. It's also a real pain to repair, so don't try it on anything you'd want to restore later.
Science created airplanes and skyscrapers, but it took faith to bring them together.
Trust me. I'm a priest.
Trust me. I'm a priest.
in the old days (on smaller kits), to achieve realistic laser hit, i'd use a magnifying glass/sun to create the damage then hold the kit above a candle and "streak" the area with soot. a wash of clear and you're laser burns rock.
clearly not as precise as an airbrush, but good for giggles on the cheap kits.
clearly not as precise as an airbrush, but good for giggles on the cheap kits.
-
Lt. Z0mBe

- Posts: 7311
- Joined: Thu May 29, 2003 1:46 pm
- Location: Balltown Kentucky, by God!
- Contact:
Ohh sorry. I didn't read very well as I was at work.starmanmm wrote:Thanks, but I guess my question was, do you use more brown than black? I figure there would be grey, but I guess that you are not to really use the color black, for that is not a real representation?
I generally use greys, sometimes with a hint of rusty browns Sometimes, to convey metallics, I'll use ground pencil lead too. Also, I'll very lightly dust a coat with a dull coat of some type to fix pastels if I need more than one color.
Say I need a dark grey area with a metallic and lighter grey center. I would apply the dark grey arey. Lightly fix. Apply the light grey area. Apply an even lighter fix. Then, apply the ground pencil lead.
I hope this helps.
Kenny
What I also found to be interesting is that I took photos of a car I was taking apart with a torch (specifically, the rear quarters). Where I made the cut was white (and I do mean white) along the cut line, with the various shades of blacks/greys stretching away from my cut.
I guess this got me to thinking that for making blast marks, should they be white where the penetration is, with the darker colors dusted away from the blast area?
This is all great info.
I just believed that straight black was not necessarlily the right thing to do.
I guess this got me to thinking that for making blast marks, should they be white where the penetration is, with the darker colors dusted away from the blast area?
This is all great info.
I just believed that straight black was not necessarlily the right thing to do.
-
Jagdson
- Posts: 8738
- Joined: Mon Jul 15, 2002 8:27 pm
- Location: Hunched over my keyboard like a *pothoc* vulture, cursing my inability to properly budget my time.
The white, or light grey, strikes me as being a fast & dirty oxidation effect. Methinks that starship armor ought to have layers, such as a highly refractive exterior and an interior designed to spread any thermal penetration quickly (so as to minimize burn-throughs).
Molten metals would harden fairly quickly, but not before some chemical recombination took place in presence of the high energies and vaporized debris. The stereotypical silvery look of a fresh metal surface would be pretty unlikely.
Any metallurgists out there, correct the assumptions if need be. I'm just going by layman's logic and the odd bit of fun with explosives and oxyacetaline torches.
Science created airplanes and skyscrapers, but it took faith to bring them together.
Trust me. I'm a priest.
Trust me. I'm a priest.
-
kosherbacon

- Posts: 335
- Joined: Tue Jan 31, 2006 7:01 pm
- Location: why do you need to know?......STALKERS!!!!
- Contact:
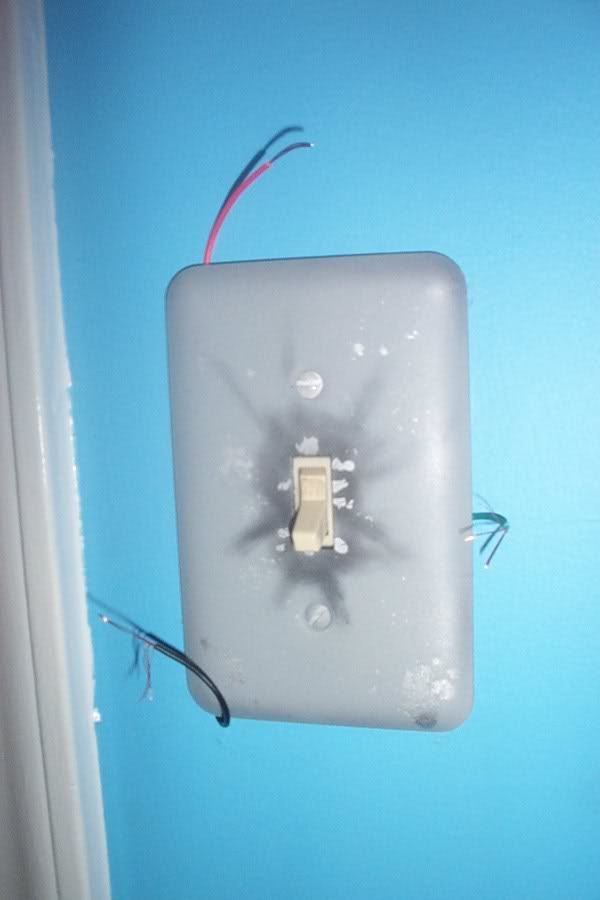
what i think looks good is when you have the metal spots
thats jus the way i think
heres an example on the light switch in my room
http://i71.photobucket.com/albums/i135/ ... tplate.jpg
thats jus the way i think
heres an example on the light switch in my room
http://i71.photobucket.com/albums/i135/ ... tplate.jpg
"It matters if you just don't give up"
~Stephen Hawking
~Stephen Hawking
-
MillenniumFalsehood

- Posts: 16993
- Joined: Tue Nov 16, 2004 5:23 pm
- Location: Wichita, KS, USA
- Contact:
Fuse makes really good phaser burns for Trek kits.
If a redhead works at a bakery, does that make him a gingerbread man?
Ponies defeat a Star Trek villain? Give them a Star Wars award ceremony!
Ponies defeat a Star Trek villain? Give them a Star Wars award ceremony!
-
TER-OR

- Site Admin
- Posts: 10531
- Joined: Thu Jul 11, 2002 7:05 pm
- Location: Conjugate imprecision of time negates absolute determination of location.
- Contact:
And if there's a way you can replicate bubbled/delaminated metal that's a great idea. Even some grit glued in place, then painted over can look good. Of course, you have scale to think about so these would be places where hull material lifted from bulkheads etc...
Raised by wolves, tamed by nuns, padded for your protection.
Terry Miesle
Never trust anyone who says they don't have a hobby.
Quando Omni Flunkus Moratati
Terry Miesle
Never trust anyone who says they don't have a hobby.
Quando Omni Flunkus Moratati

I tend to use a veeeeerrrrrryyy thin black that barely shows up at all and I add it in layers (sometimes adding darker layers or brownish layers) until I think it looks good. I have also used pencils and a cigarette lighter held a bit away (I don't smoke but I have found several good uses for lighters

