The thing is, it looks really stark and I think it would benefit from weathering. On the other hand, Star Trek ships are usually very pristine and clean looking, so I'm just looking for some tips on how you guys approach weathering a ship without making it look like it's either flown through a space dumpster or used for Klingon target practice?
Weathering Starfleet ships?
Moderators: DasPhule, Moderators
Weathering Starfleet ships?
I need some advice. I'm working on a Federation model kit (here is the WIP thread), and I'm pretty much done the paintjob.
The thing is, it looks really stark and I think it would benefit from weathering. On the other hand, Star Trek ships are usually very pristine and clean looking, so I'm just looking for some tips on how you guys approach weathering a ship without making it look like it's either flown through a space dumpster or used for Klingon target practice?
The thing is, it looks really stark and I think it would benefit from weathering. On the other hand, Star Trek ships are usually very pristine and clean looking, so I'm just looking for some tips on how you guys approach weathering a ship without making it look like it's either flown through a space dumpster or used for Klingon target practice?
"What do you want, you moon-faced assassin of joy?"
--Londo Mollari
"There's coffee in that nebula."
--Kathryn Janeway
--Londo Mollari
"There's coffee in that nebula."
--Kathryn Janeway
-
southwestforests

- Posts: 3318
- Joined: Sun Oct 24, 2010 3:09 pm
- Location: Right smack in middle of Missouri
A light dulling of the finish. If an airbrush is available, mist a coat of some dusty color over the model, just on the edge of being enough to show 
"There are a thousand things that can happen when you go light a rocket engine, and only one of them is good."
Tom Mueller of SpaceX, in Air and Space, Jan. 2011
Tom Mueller of SpaceX, in Air and Space, Jan. 2011
-
TER-OR

- Site Admin
- Posts: 10531
- Joined: Thu Jul 11, 2002 7:05 pm
- Location: Conjugate imprecision of time negates absolute determination of location.
- Contact:
I usually suggest people rely more on shading than weathering with that scale and subject. Every ship will leak lubricants etc - but the scale kills most any application. Think of when you're on an airliner and look at the spoilers and ailerons etc. You see the dirt caught on the lubricants streaking back. You don't see it when that plane is on the flightline or farther in the air. It's a very subtle thing.
If you want, you can undershade. You can also use pastel dust to provide some subtle streaking, and use kneaded eraser to remove excess. Overall I'd say gray undershading in areas would be the best likely technique.
If you want, you can undershade. You can also use pastel dust to provide some subtle streaking, and use kneaded eraser to remove excess. Overall I'd say gray undershading in areas would be the best likely technique.
Raised by wolves, tamed by nuns, padded for your protection.
Terry Miesle
Never trust anyone who says they don't have a hobby.
Quando Omni Flunkus Moratati
Terry Miesle
Never trust anyone who says they don't have a hobby.
Quando Omni Flunkus Moratati
Thanks for the advice, guys! 
I'm afraid I don't have access to an airbrush, so I think I'm going to try the pastel shading, with maybe a grey grunge wash beforehand. I'll let you know how it goes.
I'm afraid I don't have access to an airbrush, so I think I'm going to try the pastel shading, with maybe a grey grunge wash beforehand. I'll let you know how it goes.
"What do you want, you moon-faced assassin of joy?"
--Londo Mollari
"There's coffee in that nebula."
--Kathryn Janeway
--Londo Mollari
"There's coffee in that nebula."
--Kathryn Janeway
-
TER-OR
- Site Admin
- Posts: 10531
- Joined: Thu Jul 11, 2002 7:05 pm
- Location: Conjugate imprecision of time negates absolute determination of location.
- Contact:
Whatever you do, don't over-do it. Subtle is the rule at this scale. I'd avoid the "grunge" wash. It's appropriately named - usually it makes things look grungy.
Raised by wolves, tamed by nuns, padded for your protection.
Terry Miesle
Never trust anyone who says they don't have a hobby.
Quando Omni Flunkus Moratati
Terry Miesle
Never trust anyone who says they don't have a hobby.
Quando Omni Flunkus Moratati

Agree with that. It also depends on how close you want the "audience" to come. For a real close look, a subtle shading with an airbrush is the way to go. I recently tried a black ink wash on a SW Venator conversion, and when you take a close look the thing looks literally dirty - even though the "long range" effect is perfect.TER-OR wrote:Whatever you do, don't over-do it. Subtle is the rule at this scale. I'd avoid the "grunge" wash. It's appropriately named - usually it makes things look grungy.
grinded artist chalk might be a way to try. another thing that can work wonders is using graphite or rubbed soft pencil mine: take a piece of cardboard and draw an area with a soft pencil, so that a black, shiny spot is created. Then wrap a piece of cotton cloth around your finger, rub some graphite off of that spot, and rub/transfer it gently over the kit's surface.
The effect is a very subtle and gradual weathering which works on a lot of scales, and especially well on very light surfaces. Additionally, you get a metallic shimmer to egdes and corners, which adds realism, too. I used it on Kenner Star Wars toys, as well as on model kits like mecha - easy to do and effective.
Just make sure you use a really soft pencil, or use artists' graphite. Best way is to ask in a hobby shop, normal "school pencils" tend to be too hard for this treatment.
DizzyFugu - Reporting from Germany
http://www.flickr.com/dizzyfugu
http://www.flickr.com/dizzyfugu
-
USSARCADIA
- Posts: 1950
- Joined: Fri Jul 12, 2002 7:29 pm
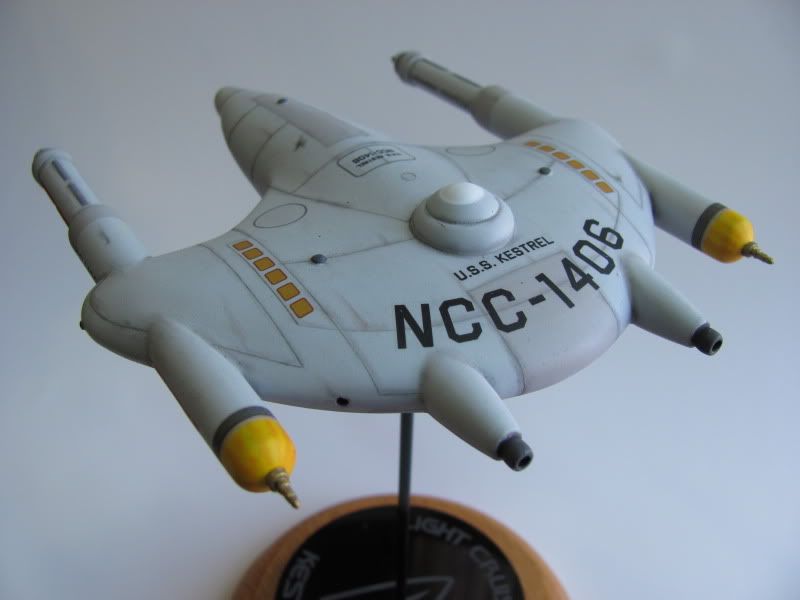
The pastel chalks are the way to go, but I'd suggest putting a matte spray coat down first, like a light, misty coat of Testors Dullcoat. I use a piece of 60 grit sandpaper, with white ground down on the sandpaper on one side and black on the other. You can drag each color together to make various shades of gray in the middle. Use an old brush to apply, lighlty at first. you can always add more. Here's my Kestrel using pastels in the recesses and penciled grid lines(also used some orange on the nacelle tips):
http://img.photobucket.com/albums/v72/u ... G_0492.jpg
You might want to practice on another model before moving to you Current build. Have fun.
http://img.photobucket.com/albums/v72/u ... G_0492.jpg
You might want to practice on another model before moving to you Current build. Have fun.
Did you eat your Chocolate Frosted Sugar Bombs this morning?
That's pretty much exactly like I wanted it to look in my head -- thanks, man!USSARCADIA wrote:The pastel chalks are the way to go, but I'd suggest putting a matte spray coat down first, like a light, misty coat of Testors Dullcoat. I use a piece of 60 grit sandpaper, with white ground down on the sandpaper on one side and black on the other. You can drag each color together to make various shades of gray in the middle. Use an old brush to apply, lighlty at first. you can always add more. Here's my Kestrel using pastels in the recesses and penciled grid lines(also used some orange on the nacelle tips):
http://img.photobucket.com/albums/v72/u ... G_0492.jpg
You might want to practice on another model before moving to you Current build. Have fun.
Looks like it's time to shop for pastels and chalk... Just to re-cap, the order of operations should be paint, then decals, then clear coat, then weathering, than another clear coat, right?
"What do you want, you moon-faced assassin of joy?"
--Londo Mollari
"There's coffee in that nebula."
--Kathryn Janeway
--Londo Mollari
"There's coffee in that nebula."
--Kathryn Janeway
-
southwestforests
- Posts: 3318
- Joined: Sun Oct 24, 2010 3:09 pm
- Location: Right smack in middle of Missouri
Pretty much.CarlGo wrote:Looks like it's time to shop for pastels and chalk... Just to re-cap, the order of operations should be paint, then decals, then clear coat, then weathering, than another clear coat, right?
"There are a thousand things that can happen when you go light a rocket engine, and only one of them is good."
Tom Mueller of SpaceX, in Air and Space, Jan. 2011
Tom Mueller of SpaceX, in Air and Space, Jan. 2011
Hi,
I wanted to continue this topics since it's close enough my question.
What are the weathering principles for space ships? What elements have an effect on the surface? And which ones are suitable for the different scales?
I'm mainly interested of space ships in ~1:4000 scale and fighters in 1:72, but tips for other scales are also welcome. With space ships I suppose rust is out of question since there isn't oxygen in the space. Leaking lubricants and air could do something but considering the scale they're probably out also. How about space junk and dust? I imagine some ships have cavities that collect space trash, i.e. Omega Destroyer from B5. There's no gravity so the dust and other stuff would glide from the front to back. Extreme heat could have an impact. There's always the weapon hit marks. But anything else? How about long time exposure to radiation and sun light?
I think I'll try my skills with shading on my next model but I'd like to add that little something. I just don't know what and how yet.
Second that - I'd counter-shade panels with a slightly lighter color than the basic tone "below" (either with an air brush, or by hand and brush), and maybe just apply a VERY thin ink wash that just emphasizes engravings or edges - too much of that will look rather dirty and is only suitable for larger scale vehicles.TER-OR wrote:I usually suggest people rely more on shading than weathering with that scale and subject.
On the other side you have to decide whether you want a "realistic" look (which would be rather clean and pretty boring), or add some drama through the finish. The latter needs more color contrast, but can easily become too much. It really comes up to personal taste, IMHO.
DizzyFugu - Reporting from Germany
http://www.flickr.com/dizzyfugu
http://www.flickr.com/dizzyfugu