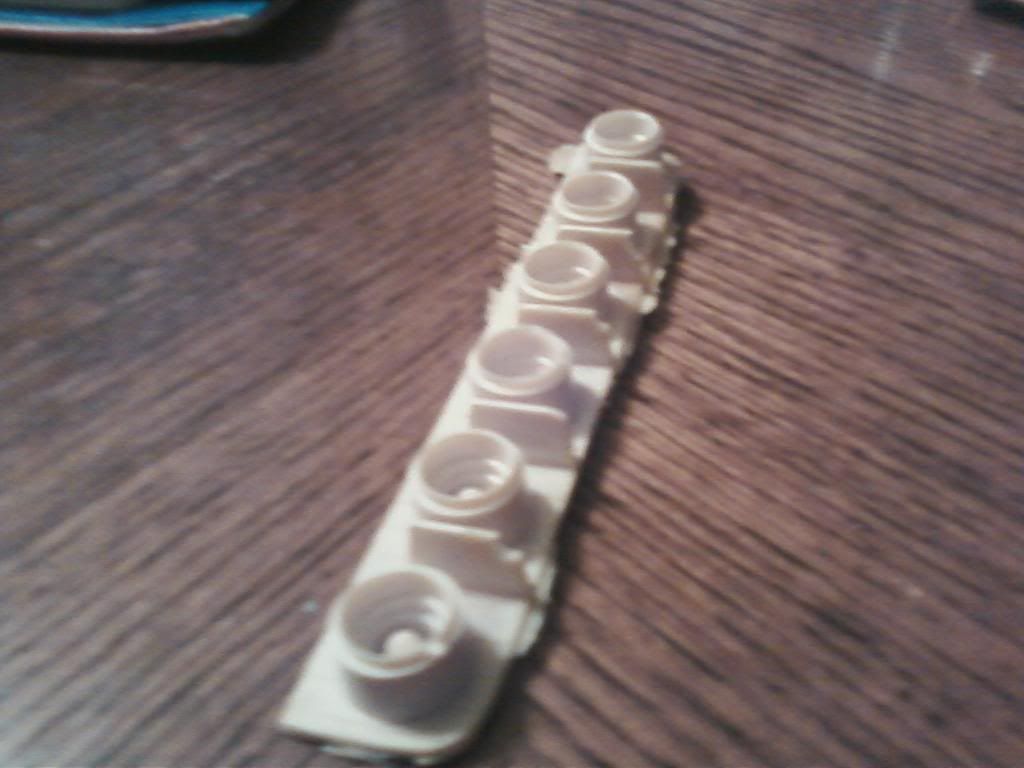
I am working on a 1/72nd scale XB-70 and need to make a replacement engine bulkhead. I have made a mold from a part Kylwell lent me and the mold turned out pretty good. I have brushed resin into the mold with varying results. I don't have access to a pressure pot. Not that it would do me much good since I didn't vacuum the RTV. Any ideas on how to best cast this or how to patch the voids? My best pull is the first image.
http://i226.photobucket.com/albums/dd85 ... image1.jpg
http://i226.photobucket.com/albums/dd85 ... image2.jpg
http://i226.photobucket.com/albums/dd85 ... image3.jpg
Let me know if you can't see the images.
Vern
Eliminating voids without a pressure pot?
Moderators: DasPhule, Moderators
-
admiralcag

- Posts: 975
- Joined: Fri Jun 20, 2003 6:46 am
- Location: Arvada, CO
Eliminating voids without a pressure pot?
It's a great day for America, everybody!

What kind of mold is it - two part, envelope, open face? What's the pot life of your resin?
As far as eliminating air bubbles, start by mixing your resin slowly so you don't introduce more air. Also try pouring it very slowly if it's a slow pot life. When I pour smaller parts, I hold the stir stick against the edge of the cup where the resin is flowing - that allows the resin to follow the stick down towards the mold opening rather than just hoping I'm aiming right. By directing the resin, I can make sure it fully fills the mold.
You could also try tapping or squeezing the mold part way through the pour to bring air bubbles to the surface, then pour some more. Again, this depends on the pot life of the resin you're using.
Modular
Models
Build your fleet
YOUR way.
http://www.modular-models.com
----------------------------------------------------------
"I know you think you understand what you thought I said, but I'm not sure you realize that what you heard is not what I meant." - Alan Greenspan
____________________________________
"The customer that spends the least complains the most."
I don't use any release coating but a lot of my parts are very small so they come out of the molds fairly easily.
Modular
Models
Build your fleet
YOUR way.
http://www.modular-models.com
----------------------------------------------------------
"I know you think you understand what you thought I said, but I'm not sure you realize that what you heard is not what I meant." - Alan Greenspan
____________________________________
"The customer that spends the least complains the most."
Models
Build your fleet
YOUR way.
http://www.modular-models.com
----------------------------------------------------------
"I know you think you understand what you thought I said, but I'm not sure you realize that what you heard is not what I meant." - Alan Greenspan
____________________________________
"The customer that spends the least complains the most."
-
Umi_Ryuzuki

- Posts: 3841
- Joined: Fri Jul 12, 2002 2:22 pm
- Location: PDX, Oregon
- Contact:
-
Stu Pidasso

- Posts: 20354
- Joined: Thu Jul 11, 2002 7:30 pm
- Location: The Human Dutch Oven.
Okay, I'll do my best, without seeing what the mold looks like:
Mix and pour your resin in until the mold is 1/2 full. Then "flex" or bend the mold outward (like you're opening a book) to dislodge the air bubbles. Let them rise, then pour the rest of the resin into the cavity. Also, this might sound weird, but if you have something that... ahem... vibrates in the house, it won't hurt to place that against the mold, that will also bring bubbles to the surface.
Hope this helps!
So me, trying to be tolerant of everybody's situations, went to a feminist picnic. Things fell apart fairly quickly after nobody made any sandwiches.
-
admiralcag
- Posts: 975
- Joined: Fri Jun 20, 2003 6:46 am
- Location: Arvada, CO
I made a one-part mold. The inside of the bulkhead is inside the plenum chamber and not visible. I am using Alumilite. The pot life is only a couple of minutes and it is even shorter with the small batches I am mixing. A couple of the voids were caused by trying to get a little more resin in the mold after it had started to bloom. Do you guys think I will have enough time to work the resin?
Lots of good ideas. Jimi, if I can find my orbital sander, I can vibrate the mold. The way you said it made me laugh. Only you can create those mental images
Vern
Lots of good ideas. Jimi, if I can find my orbital sander, I can vibrate the mold. The way you said it made me laugh. Only you can create those mental images
Vern
It's a great day for America, everybody!
Coating the mold with baby powder will help quite a bit. It will break up the surface tension of the resin and make it flow better. Just make sure to either knock or blow out any excess powder. A fine coating is all you will need.
As already mentioned using something like a toothpick to pull out the bubbles will also help.
Another thing you might want to think about using a lower viscosity resin such as Smooth-On 320 or 300. It has a about a 3 minute work time before it blooms which should be plenty.
Dave
As already mentioned using something like a toothpick to pull out the bubbles will also help.
Another thing you might want to think about using a lower viscosity resin such as Smooth-On 320 or 300. It has a about a 3 minute work time before it blooms which should be plenty.
Dave
-
Tankmodeler
- Posts: 949
- Joined: Fri Jul 30, 2010 12:04 am
- Location: Ontario
Yeah, the Alumilite is probably going to make this really tricky. It just cooks off so darned fast.
The longer pot life Smooth-on products, like the 320, have significantly longer pot life. I usually get 4-6 minutes out of the 320 and that's plenty of time to agitate the bubbles out of the mould. There may still be a couple pin holes, but that may be unavoidable.
Paul
The longer pot life Smooth-on products, like the 320, have significantly longer pot life. I usually get 4-6 minutes out of the 320 and that's plenty of time to agitate the bubbles out of the mould. There may still be a couple pin holes, but that may be unavoidable.
Paul
The future is in your hands. Build it!
-
Grumpy Popeye
- Posts: 1011
- Joined: Fri Jul 12, 2002 9:11 pm
- Location: Lower left hand of Canada, surrounded by a moat!
I've rested an old electric toothbrush against the side of a mold to good effect.Stu Pidasso wrote: Also, this might sound weird, but if you have something that... ahem... vibrates in the house, it won't hurt to place that against the mold, that will also bring bubbles to the surface
The rakishly handsome artist formerly known as Darph Bobo
For those who have used baby powder in molds, do you know if its usable with Clear epoxy resin (Clear Cast)? Or will the powder discolor or affect the clarity of the cured resin?skymods wrote:Coating the mold with baby powder will help quite a bit. It will break up the surface tension of the resin and make it flow better. Just make sure to either knock or blow out any excess powder. A fine coating is all you will need.
-
Tankmodeler
- Posts: 949
- Joined: Fri Jul 30, 2010 12:04 am
- Location: Ontario
_Anything_ you put on the surface of your mould will affect the surface of the Clear Cast. Spray mould release, when applied thinly, will have a minimum affect, especially of you don't disturb the surface of the coated mould when the resin is in place and can usually be removed after demoulding by washing with detergent or TSP. But some releases either apply heavily or have a powder base and still _may_ affect the clear cast.kenno3 wrote:For those who have used baby powder in molds, do you know if its usable with Clear epoxy resin (Clear Cast)? Or will the powder discolor or affect the clarity of the cured resin?
Talcum powder (baby powder) will absolutely, positively bond to the surface of the part and will make the part, at best, translucent and, at worst, mostly opaque.
If you are planning to go into production of these parts, Clear Cast probably isn't your best choce of material (at least the polyester Clear Cast I remember wouldn't be). There are clear casting resins of other chemistries that would be much better. However, if you are only making a very few parts (say under 15-20) then an RTV Silicon mould can be poured without release and the parts will come out very clean. The mould will deteriorate much faster than if prepped with release, but it will certainly work for a reduced number of parts without release. Silicon is naturally resistant to _anything_ bonding to it. (Except other RTVs, which bond like crazy).
HTH
Paul
The future is in your hands. Build it!
-
scratchy

- Posts: 1663
- Joined: Fri Feb 06, 2009 8:06 pm
- Location: Langley, British Columbia Canada
- Contact:
I've punched some vent holes in a couple of my molds to eliminate this problem. I chose an area on the part with no detail and it's the highest point in the mold so that the air bubble works it's way out, so it's easy enough to trim and sand down once the part has cured.
I should let it be known, I don't have a pressure pot, and I've never had the opportunity to use one.
I should let it be known, I don't have a pressure pot, and I've never had the opportunity to use one.
-
Antenociti
- Posts: 565
- Joined: Sun Mar 12, 2006 8:43 pm
- Location: Shrewsbury, UK
- Contact:
Re: Eliminating voids without a pressure pot?
well, if you get a pressure pot you wont need to vacuum the RTV moulds, just pressure-cast them also - job done. (unless you are using a really soft silicone then pressure-cast RTV moulds will not distort after full-cure). I've gone down to shore 15 without any issues, just make sure you can keep the pressure constant overnight.admiralcag wrote: I don't have access to a pressure pot. Not that it would do me much good since I didn't vacuum the RTV.
Vern
As other shave said talcum powder (aka French Chalk) works to help pull resin into small detail, ensure it is a dusting though and doesnt pile-up into small detail recesses. Graphite also works, but frnech chalk is easier to get hold of.
Wont work with clear-casts though (as others have already said). Mould-release agents will also tend to cloud the surface on clear-casts although sometimes the resultant partially-opaque parts can be desirable (such as for TO camouflaged figures).
In general for tricky parts that require time to ensure good casts, use a much longer pot-life resin with an extended cure-time to maximise your available working time...or get a pressure pot system which is very cheap and saves an awful lot of the hassle.
2nd-hand pressure-pots are available on eBay a lot, Harbour Freight in the USA do a nice one for $80, often on sale to $40, and a cheap compressor for DIY work is all you need to get a 40-50psi working pressure. Comp+pot is often under $100 and pays for itself in easier and better castings within hours.
-
admiralcag
- Posts: 975
- Joined: Fri Jun 20, 2003 6:46 am
- Location: Arvada, CO
I was under the impression that if you pressure cast with a mold that hadn't been vacuumed, the mold would collapse. Is this not correct?Antenociti wrote:well, if you get a pressure pot you wont need to vacuum the RTV moulds, just pressure-cast them also - job done.
Vern
It's a great day for America, everybody!
-
Tankmodeler
- Posts: 949
- Joined: Fri Jul 30, 2010 12:04 am
- Location: Ontario
No, not necessarily. Any mould with interior bubbles near the resin surface (near but not necessarily breaking through) will have a soft spot that the pressurised resin will distort to an extent that is related to the size of the bublbe and the nearness to the resin surface.admiralcag wrote:I was under the impression that if you pressure cast with a mold that hadn't been vacuumed, the mold would collapse. Is this not correct?Antenociti wrote:well, if you get a pressure pot you wont need to vacuum the RTV moulds, just pressure-cast them also - job done.
Vern
Vacuuming the rubber is _a_ way to eliminate all or most of the bubbles (pretty much the best way), but careful pouring and a little agitation while the rubber slowly cures will remove almost all of the bubbles and a non-vacuumed rubber could be used in a pressure pot. Of course, if you have a pressure pot, you would probably find it no trouble to vacuum your rubber.
Paul
The future is in your hands. Build it!
Hi, I bought a pressure pot and used 39 psi on my silicone rubber molds (Oomoo 30). It worked at eliminating the bubbles, but because the rubber mold wasnt made with vacuumed rubber, there are tiny bumps on my cast piece. Even tho there were no visible bubbles near the surface and I poured the rubber from high up. Also the rubber mold is ruined because the cured resin left bump impressions (opposite of the bumps on the resin), and they didnt flatten out after demolding.admiralcag wrote:I was under the impression that if you pressure cast with a mold that hadn't been vacuumed, the mold would collapse. Is this not correct?Antenociti wrote:well, if you get a pressure pot you wont need to vacuum the RTV moulds, just pressure-cast them also - job done.
Vern
Perhaps the bubbles in resin could have been squished, and the bump marks from the mold could have prevented if you pressurize the resin for 10 minutes to break the bubbles, then release pressure so the bubbles in the rubber arent deformed, all before the resin cures. But someone else can try that.
Today I bought the Harbor Freight "2.5 CFM Vacuum Pump."
http://www.harborfreight.com/25-cfm-vac ... 98076.html
I hope that works at pulling 29 inches of mercury the next time I make rubber molds.