I am working on a subject that has a ton of tiny rectangular windows on it that I would like to open up for lighting but I am not sure the best method to make consistant sized openings - any tips? I thought about just using a drill bit then trying to square off the window via a hobby blade but that is going to be tough as the windows are very small and there are many.
The kit is hollow resin and the walls fairly thick. I was thinking some sort of a punch or file but not sure how that would work out with the resin.
TIA for any suggestions!
Tips for making tiny rectangular "windows"?
Moderators: DasPhule, Moderators

-
Keptin Barnes

- Posts: 4695
- Joined: Mon Oct 18, 2004 4:23 pm
- Location: Hilo, HI in a state of Wetness
- Contact:
I, too, just grab a pin-vice and drill the windows and use a file and new #11 blade to get the tiny fragment remains.
Regarding clear resin...I still have a bit of difficulty with that to not have bubbles in it. And that is after pouring the resin slowly and gently into the corner of the window and letting it flow/ooze into the opening. Then taking a pin to the masking tape to pop the bubbles from the exterior of the ship.
I still have ended up with micro-bubbles. Very frustrating. I still don't know how to get rid of those bubbles and micro-bubbles.
Anyway, I offered all I could to help. lol
"Now Father Jack. What do you say to a nice cup of tea?"
"Feck off, Cup!!"
Namaste--The Divinity within me perceives and adores the Divinity within you. We are One.
NEW STORY PUBLISHED! Check it out. My first Novelette!. April Welles:
More of my builds:
http://s209.photobucket.com/albums/bb10 ... oductions/
"Feck off, Cup!!"
Namaste--The Divinity within me perceives and adores the Divinity within you. We are One.
NEW STORY PUBLISHED! Check it out. My first Novelette!. April Welles:
More of my builds:
http://s209.photobucket.com/albums/bb10 ... oductions/
-
TER-OR

- Site Admin
- Posts: 10531
- Joined: Thu Jul 11, 2002 7:05 pm
- Location: Conjugate imprecision of time negates absolute determination of location.
- Contact:
White glue might be a better option than clear resin. Also, Future, when allowed to thicken it can make a good clear fill, and doesn't trap the bubbles as badly - but you will need to apply in several coats.
Raised by wolves, tamed by nuns, padded for your protection.
Terry Miesle
Never trust anyone who says they don't have a hobby.
Quando Omni Flunkus Moratati
Terry Miesle
Never trust anyone who says they don't have a hobby.
Quando Omni Flunkus Moratati
-
Keptin Barnes
- Posts: 4695
- Joined: Mon Oct 18, 2004 4:23 pm
- Location: Hilo, HI in a state of Wetness
- Contact:
Now, Terry. Would I place scotch tape over the window openings (as with resin) and then place a drop of Future in the opening and wait for it to dry. Then after, I dunno, 10 drop-and-dries of Future, pull off the scotch tape?
Is that how that would work?
Thanks for the assist.
Is that how that would work?
Thanks for the assist.
"Now Father Jack. What do you say to a nice cup of tea?"
"Feck off, Cup!!"
Namaste--The Divinity within me perceives and adores the Divinity within you. We are One.
NEW STORY PUBLISHED! Check it out. My first Novelette!. April Welles:
More of my builds:
http://s209.photobucket.com/albums/bb10 ... oductions/
"Feck off, Cup!!"
Namaste--The Divinity within me perceives and adores the Divinity within you. We are One.
NEW STORY PUBLISHED! Check it out. My first Novelette!. April Welles:
More of my builds:
http://s209.photobucket.com/albums/bb10 ... oductions/
-
TER-OR
- Site Admin
- Posts: 10531
- Joined: Thu Jul 11, 2002 7:05 pm
- Location: Conjugate imprecision of time negates absolute determination of location.
- Contact:
The adhesive will be a problem. Cut a bit of glossy plastic film and place on the scotch tape. Then tape with the film covering the opening, and fill from the inside. If you're using Envirotex light you can give it time to de-gas and fill. Otherwise, it will take a few layers of Future.
I figured that out when doing this project:
http://modelingmadness.com/reviews/kore ... ebeech.htm
Partway down you can see where I filled from the outside, as the curve was easier to deal with that way. The shiny area is where the glossy plastic film covered the openings, it ends where the adhesive adhered.
The side windows of those Beeches are Envirotex. Now I'll often replace small windows with the Envirotex as a matter of course.
Raised by wolves, tamed by nuns, padded for your protection.
Terry Miesle
Never trust anyone who says they don't have a hobby.
Quando Omni Flunkus Moratati
Terry Miesle
Never trust anyone who says they don't have a hobby.
Quando Omni Flunkus Moratati
-
MillenniumFalsehood

- Posts: 16991
- Joined: Tue Nov 16, 2004 5:23 pm
- Location: Wichita, KS, USA
- Contact:
Which kit exactly are you talking about? If it doesn't have too much surface details or it has details you can replicate easily, try this:
Mark off all the windows you want lit.
Take a Dremel and cut out the general area where you want the lights.
Fill the area with clear epoxie
Sand it flat
Mask the lit windows and paint.
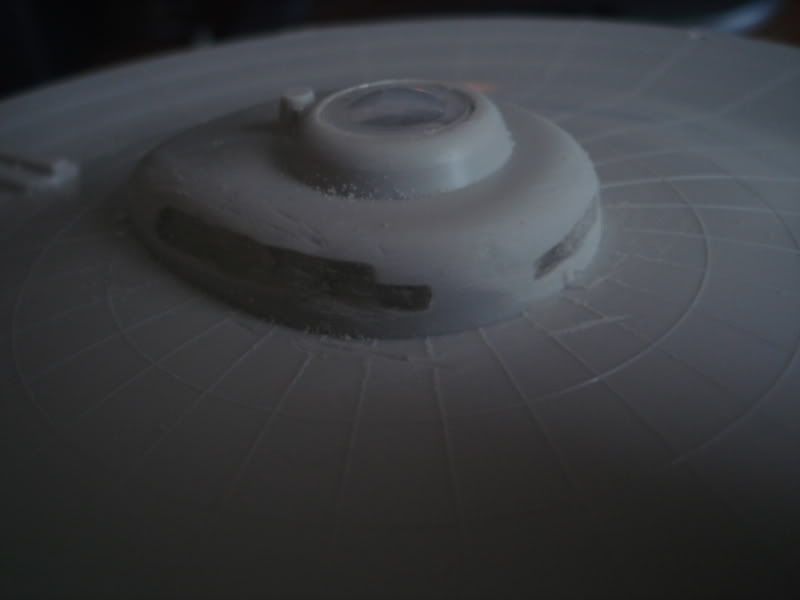
Light channel for a TOS Enterprise bridge cut out and filled.
The effect is a nice, soft glow.
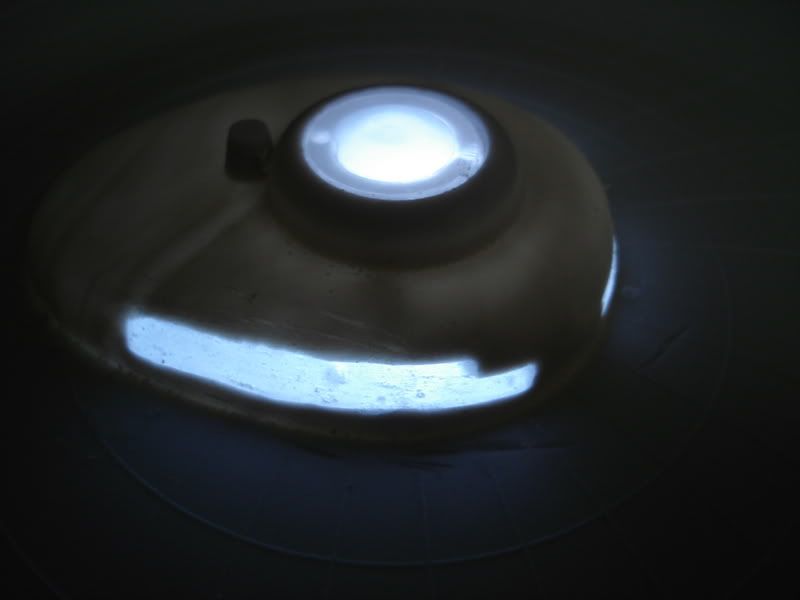
On this Klingon ship you can't even see where the plastic ends and the epoxie begins, and you can't tell the difference between the unlit ones and the lit ones(mostly)
Voila! Perfect windows and not a bit of tedious drilling. This works especially well on ST:TOS subjects like the Enterprise.
Mark off all the windows you want lit.
Take a Dremel and cut out the general area where you want the lights.
Fill the area with clear epoxie
Sand it flat
Mask the lit windows and paint.
Light channel for a TOS Enterprise bridge cut out and filled.
The effect is a nice, soft glow.
On this Klingon ship you can't even see where the plastic ends and the epoxie begins, and you can't tell the difference between the unlit ones and the lit ones(mostly)
Voila! Perfect windows and not a bit of tedious drilling. This works especially well on ST:TOS subjects like the Enterprise.
If a redhead works at a bakery, does that make him a gingerbread man?
Ponies defeat a Star Trek villain? Give them a Star Wars award ceremony!
Ponies defeat a Star Trek villain? Give them a Star Wars award ceremony!
-
Keptin Barnes
- Posts: 4695
- Joined: Mon Oct 18, 2004 4:23 pm
- Location: Hilo, HI in a state of Wetness
- Contact:
Interesting ideas from both of you, MF and Terry. I may give them both a try.
Thanks.
Thanks.
"Now Father Jack. What do you say to a nice cup of tea?"
"Feck off, Cup!!"
Namaste--The Divinity within me perceives and adores the Divinity within you. We are One.
NEW STORY PUBLISHED! Check it out. My first Novelette!. April Welles:
More of my builds:
http://s209.photobucket.com/albums/bb10 ... oductions/
"Feck off, Cup!!"
Namaste--The Divinity within me perceives and adores the Divinity within you. We are One.
NEW STORY PUBLISHED! Check it out. My first Novelette!. April Welles:
More of my builds:
http://s209.photobucket.com/albums/bb10 ... oductions/
It's a little late but...
I use carpet needles stuch in dowl rods to do the holes.
Push the needles into the dowl point first leaving the eye uncovered.
Heat the needle over a candle until just hot enough to melt the plastic and press through the kit where the window is needed.
Finish with sand paper and needle files.
The trick is to use a needle that is as close to the size window as possible and not to over heat it. I heat the tip of the eye only so when I press into the plastic only the eye does any melting, once past the eye the needle is cool enough it stops melting the plastic.