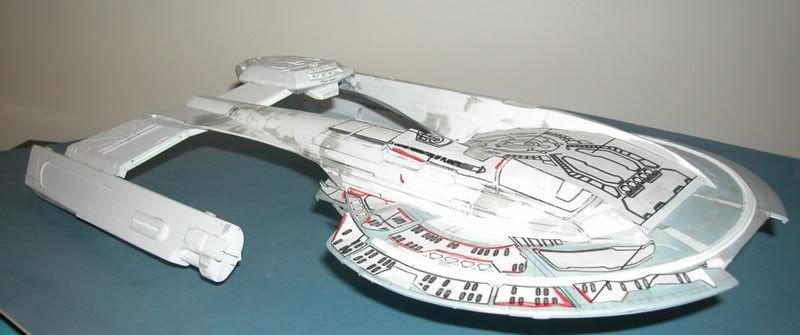
Looking exactly like this, this model took 2nd place in the "Special" Category in the Northern Virginia Modelers chapter of IPMS on Wednesday.
http://i88.photobucket.com/albums/k170/ ... n/0057.jpg
To put this 2nd place award into perspective, the November Special Category of NoVa Modelers was entitled "Shelf of Doom". Only models that would never be finished, for one reason or another, were to be entered in "Shelf of Doom."
Oddly enough, no one ever asked me why I never was going to finish this model, despite putting what I'm going to estimate at about 500 hours of effort so far, into it. In fact, the Star Trek guys implored me to complete the model, at least so they could cast copies of it. But to answer the obvious question, I don't plan on finishing this model for the following reasons. 1. I started this model in 2001 when I was unemployed and had the spare time to start a project like this. 2. Its 1/800 scale. Its not compatible with any of the predominate scales, especially any version of Enterprise-E I know of, or any Borg cubes. 3. It has a couple of fundamental issues with the primary hull that can only be fixed by completely rebuilding it. There is a shallow depression running through the mid section, because I didn't check exterior alignments when I reconfigured the Enterprise-D primary hull. 4. Despite finally solving the porthole problem by figuring out how to make my own custom die-punch, making the rest of the armour panels with port holes is a heroic effort. 5. And I didn't plan ahead, and the model is essentially not lightable.
For those of you who have seen this model before, nothing new here. But for those who haven't, here is the link to the entire album.
http://s88.photobucket.com/albums/k170/ ... struction/
So, yes, I'm proud of my accomplishment (for what it is), and thought some folks would enjoy seeing construction pictures of a very ambitious project, since the number of available threads here have been sparse of late.
Akira Scratchbuild
Moderators: Joseph C. Brown, Moderators
Akira Scratchbuild
Last edited by ajmadison on Mon Nov 14, 2011 10:31 am, edited 1 time in total.
-
Styrofoam_Guy
- Posts: 638
- Joined: Wed Oct 12, 2005 1:58 pm
- Location: Toronto Canada
- Contact:

-
Styrofoam_Guy
- Posts: 638
- Joined: Wed Oct 12, 2005 1:58 pm
- Location: Toronto Canada
- Contact:

-
MedixWerkeShoppe

- Posts: 203
- Joined: Sun Aug 14, 2011 10:36 pm
- Location: Ft Bragg
Thanks for the compliments.
I learned a lot with this scratchbuild.
1. That a 24" model is substantially more work than an 18" model. Just flipping it over is a substantial undertaking.
2a. Always build in sub-assemblies when ever possible. Detailing a 6" weapons pod is much easier than working on a 16" primary hull section.
2b. Where possible, build in halves. If you want to light the project later, or just fix something from the inside, having access to the interior greatly helps. I generally build from creating a profile, either overhead, or side, then adding frames to the profile to produce the final shape. If I could do this project over, and I might in a different scale, I would build from two profiles that can be mated together, not unlike the assembly/design of two fuselages halves typically found in an injected kit.
3. When using existing kit parts, even when modifying them, check *everything* about them. For example, the primary hull top of the Enterprise-A 1/535 kit, the portion of the hull that supports the B/C decks & bridge, is not level compared to the rim. It looks like its parallel to the rim, but that's because the B/C decks corrects for this problem, and the section the bridge sits on is parallel to the rim, also disguising the geometry issues. I made assumptions about the Enterprise-D kit, and didn't verify heights and contours as I added the wedges that reshaped the outer edge. This produced a noticeable wave shape between the front and back of the Akira's primary hull.
4. Be prepared to make substantial compromises if you actually want to finish a project. I was completely derailed by the simple armor plates with their porthole details. After many experiments, the affordable solution is to make a custom punch & die with the correct oblong oval shape. The non-affordable solution, though the price is coming down, is to buy a desk top laser CNC machine.
5. On the other hand, don't be afraid to complete major construction and add certain details later. I was able to add various recesses and details after the major shapes were created. In some cases, like the shallow window indents, even with very thick kit parts (compared to sheet styrene), I was able to cut 3 sides of the indent, and only score where the hull deflects into the recess, bend the kit part, then box in the sides of the recess with sheet styrene.